Publish to your social networks from n8n with Sofia
n8n has verified the Sofia node: you can now publish, schedule and follow your social media posts from any n8n workflow, without writing code. This guide walks through the installation, the connection, and a first workflow you can reproduce.
Contents
Why connect Sofia to n8n
n8n links the tools you already use: a form, an online shop, a spreadsheet, a booking system. Sofia publishes on your social networks and checks each network’s rules before sending. Together, what happens in your business can become a post, with nobody copying and pasting.
A few workflows worth building first:
- A new row in a spreadsheet becomes a scheduled post: handy for a menu of the week or a list of events.
- A new product in your shop is announced on your networks as soon as it goes on sale.
- A post that a network refuses sends a message to your team, so someone fixes it the same day.
Install the Sofia node
Sofia is a verified node: n8n has reviewed its code, and it installs from the editor, on n8n Cloud as well as on a self-hosted instance.
- In a workflow, click “+” to open the nodes panel and search for “Sofia”.
- Select Sofia, then “Install node”. The owner of the instance does it once, for every member.
- If Sofia does not appear yet, update n8n. On a self-hosted instance, you can also install the package n8n-nodes-sofia-post from “Settings › Community nodes”.
Connect your Sofia account
The node signs in with a personal key. One key acts for you on every Workspace you belong to, so a single credential reaches all your establishments.
- In Sofia, open the settings, “Sofia API” page, “Personal access” tab, and create a key. Copy it right away: it is shown only once.
- In n8n, create a “Sofia API” credential and paste the key into “Personal Key”. Leave “API URL” as it is.
- Save: n8n tests the key and confirms the connection.
Your first workflow: schedule a post
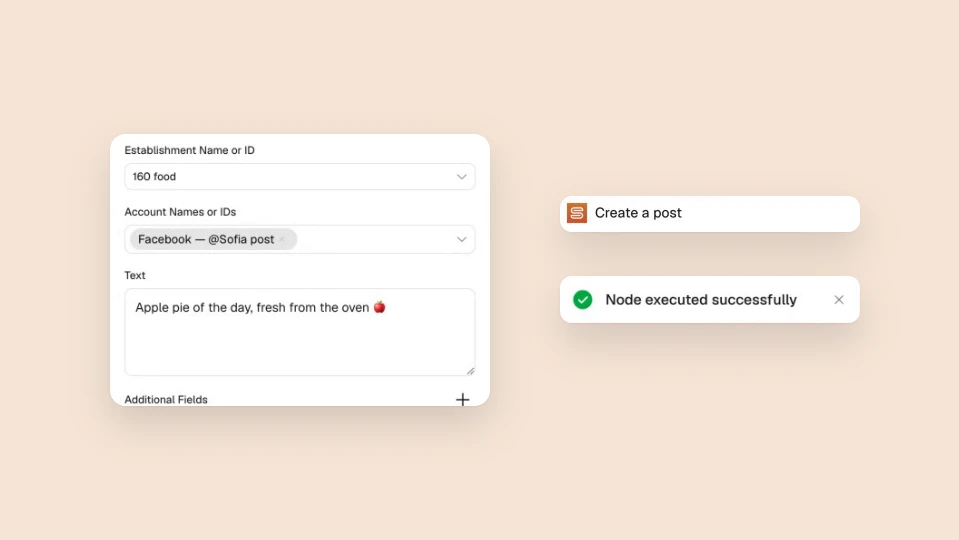
Take a restaurant that announces its dish of the day. Add a “Sofia” node, choose “Post › Create”, and fill it in:
- “Establishment”: choose yours in the list, which is filled from Sofia.
- “Accounts”: select the networks to publish on. Each chosen account receives a post, with the same text.
- “Text”: write the post, or map a field from the previous step, such as a spreadsheet cell.
- Under “Additional Fields”, add “Media URLs” for a photo or a video, and “Schedule At” for the date. Leave the date empty to publish now, or turn “Draft” on to save without publishing.
React when a post is published or fails
A second node, “Sofia Trigger”, starts a workflow when a post goes live (“Post Published”) or when a network refuses it (“Post Failed”). Connect it to Slack, to an email or to a spreadsheet, and your team knows what happened without opening Sofia.
The trigger checks Sofia at regular intervals and starts with the posts that appear after the workflow is activated; earlier posts are not replayed. To read a post at any time, the “Post › Get” operation returns its status, its link and the answer of each network.
With Sofia in n8n, publishing becomes one step of your automations like any other. The n8n guide of the Sofia documentation describes the node’s operations and its errors.